


Manual
do
Maker
.
com
LVGL - Matriz de botões ou containers com botões?


Antes de levantar a questão novamente, talvez seja necessária uma abordagem sobre containers para depois escolher entre matriz de botões ou containers com botões.
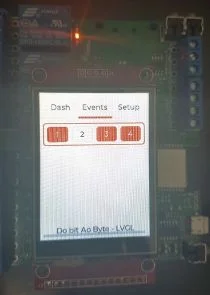
Layout com LVGL
Não vou ainda discorrer sobre layout com LVGL, mas sim, temos os componentes necessários para criar um layout elaborado do mesmo modo que em IDEs para aplicativos desktop como Delphi e QtCreator. No caso do container, trata-se de um recipiente para alocar outros componentes. Definimos a forma que ele vai tomar na tela e todo o resto que nele for inserido se organizará conforme as especificações. Apesar de ser espetacular, tem contrapartidas e, principalmente em relação à matriz de botões, ele deve se tornar uma opção secundária para botões.
A matriz de botões é mais simples de implementar em relação ao layout com containers. O outro ponto é que a matriz de botões consome bem menos memória por botão.
Pra não entrar muito na teoria, incluirei uma matriz de 4 botões para atuar sobre os relés da placa AFSmartControl. Essa será a primeira implementação funcional da interface que desenvolveremos para essa placa com ESP32.
Texto dos botões
Normalmente criamos um label a ser inserido no botão. Como temos uma matriz de botões, criaremos um array de strings para passar ao objeto. Um requisito fundamental (e documentado) é que esse map contenha um campo extra com uma string vazia, portanto o formato de nosso array de strings será:
const char * map[] = {"btn1", "btn2", "btn3", "btn3",""}
Claro, as strings serão outras. Também podemos quebrar a matriz em linhas, usando simplesmente um terminador LF ("\n"). Da mesma forma que em IDEs visuais (acredito que essa biblioteca terá a sua em breve), temos as opções de controle hidden, no_repeat, disabled, checkable, ckeck_state e click_trig. A macro é precedida por LV_BTNMATRIX_CTRL_*, onde podemos substituir (por exemplo) o asterisco por HIDDEN:
LV_BTNMATRIX_CTRL_HIDDEN
Um recurso que considero importante é o "one check", que garante que somente um botão reagirá a um evento por vez. Isso evita dois acionamentos simultâneos. A documentação apresentando todos os recursos disponíveis está disponível (em inglês) nesse link. Os botões não poderão ser estilizados individualmente, mas também não me parece um grande layout um arco-iris de botões. Agora, ao código.
Manipulador de eventos
O manipulador de eventos é o callback dos botões. Quando o sinal do respectivo botão for enviado, a função de callback também executará o controlador dos relés, que é um PCF8574, controlado com a biblioteca EasyPCF8574 que criei há alguns artigos passados, e que está disponível no gerenciador de bibliotecas do Arduino, podendo ser baixado também pelo PlatformIO, caso use outra IDE, como eu.
A função de callback ficou assim:
static void event_handler_matrix(lv_obj_t * obj, lv_event_t event)
{
    if(event == LV_EVENT_VALUE_CHANGED) {
        const char * txt = lv_btnmatrix_get_active_btn_text(obj);

        pcfSmart.setInvertBit(relays[String(txt).toInt()-1]);
        Serial.print("Rele assumido: ");
        Serial.println(txt);
    }
}
Para a chamada do pcfSmart é necessário que a biblioteca EasyPCF8574 esteja instalada, instanciada e iniciada:
#include <EasyPCF8574.h>

EasyPCF8574 pcfSmart(0x27,0xFF); //endereço 0x27 e todos os pinos em high (0xFF, 255 ou 0b11111111)

...
void setup(){
    ...
    if (!pcfSmart.startI2C(21,22)){
        Serial.println("Not started. Check pin and address.");
        while (true);
    }
    ...
}
Na função que cria-se as tabs, também incluímos os widgets. Coloquei um arco na primeira aba, mas vamos ver seus controles em outro artigo, só o inseri agora para alimentar todas as abas. Vejamos como ficou a função:
void lv_ex_tabview_1(void){
    /*Cria o objeto tabview*/
    lv_obj_t *tabview;
    tabview = lv_tabview_create(lv_scr_act(), NULL);

    /*Cria 3 abas*/
    lv_obj_t *tab1 = lv_tabview_add_tab(tabview, "Dash");
    lv_obj_t *tab2 = lv_tabview_add_tab(tabview, "Events");
    lv_obj_t *tab3 = lv_tabview_add_tab(tabview, "Setup");

    //--------------------------TAB 1: arc-------------------------------------------
    lv_obj_t * labelArc;
    /*Cria um widget arco e insere na primeira tab*/
    lv_obj_t * arc = lv_arc_create(tab1, NULL); //indica a tab no lugar da screen
    lv_arc_set_end_angle(arc,170);
    lv_obj_set_size(arc, 100, 100);
    labelArc = lv_label_create(arc, NULL);
    lv_obj_align(arc, NULL, LV_ALIGN_IN_TOP_LEFT, 5, 5);
    lv_label_set_text(labelArc, "21"); // valor fictício, só pra adicionar um label no centro do widget arc
    lv_obj_align(labelArc,arc, LV_ALIGN_CENTER, 0, 0);
    //--------------------------------------------------------------------------------

    //TAB2 ---------------------------------------------------------------------------
    lv_obj_t * btnm1 = lv_btnmatrix_create(tab2, NULL);
    lv_btnmatrix_set_map(btnm1, btn_labels);
    //lv_btnmatrix_set_btn_width(btnm1, 4, 2);        /*aumenta a dimensão de um botão especifico*/
    //Ao clicar, mantém o estado, assim sabemos que o relé X deve estar ativo.
    for (uint8_t i=0;i<4;i++){
        lv_btnmatrix_set_btn_ctrl(btnm1, i, LV_BTNMATRIX_CTRL_CHECKABLE);
    }
    lv_obj_align(btnm1, NULL, LV_ALIGN_IN_TOP_MID, 0, 10); //alinhamento da matriz. Veremos mais sobre essas macros
    lv_obj_set_height(btnm1,50); //ajuste de dimensão vertical da matriz de botões. com a tela completa não será necessário
    lv_obj_set_width(btnm1,225); //ajuste horizontal da matriz de botões.
    lv_obj_set_event_cb(btnm1, event_handler_matrix);

    //--------------------------------------------------------------------------------

    //----------------------TAB 3: button-----------------------------------------------
    //segue como no artigo anterior
    lv_obj_t * labelB;

    lv_obj_t * btn1 = lv_btn_create(tab3, NULL);

    lv_obj_set_event_cb(btn1, event_handler);
    lv_obj_align(btn1, NULL, LV_ALIGN_CENTER, 0, -25);

    labelB = lv_label_create(btn1, NULL);
    lv_label_set_text(labelB, "Button");

    lv_obj_t * btn2 = lv_btn_create(tab3, NULL);
    lv_obj_set_event_cb(btn2, event_handler);
    lv_obj_align(btn2, NULL, LV_ALIGN_CENTER, 0, 25);
    lv_btn_set_checkable(btn2, true);
    lv_btn_toggle(btn2);
    lv_btn_set_fit2(btn2, LV_FIT_NONE, LV_FIT_TIGHT);

    labelB = lv_label_create(btn2, NULL);
    lv_label_set_text(labelB, "Toggled");
    //----------------------------------------------------------------------------------
    /* Create simple label */
    lv_obj_t *bb = lv_label_create(lv_scr_act(), NULL);
    lv_label_set_text(bb, "Manual do Maker - LVGL");
    lv_obj_align(bb, NULL, LV_ALIGN_IN_BOTTOM_MID, 0, -10);

}
O restante do código permanece como nos artigos anteriores. Sempre manterei a base do programa igual e incrementaremos conforme os novos recursos. O código completo agora está assim:
#include <lvgl.h>
#include <TFT_eSPI.h>
#include <stdio.h>
#include <EasyPCF8574.h>

EasyPCF8574 pcfSmart(0x27,0xFF);

TFT_eSPI tft = TFT_eSPI(); /* TFT instance */
static lv_disp_buf_t disp_buf;
static lv_color_t buf[LV_HOR_RES_MAX * 10];

uint16_t t_x = 0, t_y = 0;

unsigned long time_to_next = millis();

//BOTOES DA MATRIX
uint8_t relays[4] = {7,6,5,4}; //pinos dos relés no PCF8574 da AFSmartControl
static const char * btn_labels[] = {"1","2","3","4",""}; //labels nos botões da matriz

//prototipos
void lv_ex_btn_1(void);
void lv_ex_tabview_1(void);
void lv_ex_arc_1(void);
static void event_handler_matrix(lv_obj_t * obj, lv_event_t event);
void lv_ex_btnmatrix_1(void);

static void event_handler(lv_obj_t * obj, lv_event_t event){
    if(event == LV_INDEV_STATE_PR) {
        printf("Clicked\n");
    }
}

static void event_handler_matrix(lv_obj_t * obj, lv_event_t event)
{
    if(event == LV_EVENT_VALUE_CHANGED) {
        const char * txt = lv_btnmatrix_get_active_btn_text(obj);

        pcfSmart.setInvertBit(relays[String(txt).toInt()-1]);
        Serial.print("Rele assumido: ");
        Serial.println(txt);
    }
}

//****************************** WIDGETS ****************************************//
void lv_ex_tabview_1(void){
    /*Create a Tab view object*/
    lv_obj_t *tabview;
    tabview = lv_tabview_create(lv_scr_act(), NULL);

    /*Add 3 tabs (the tabs are page (lv_page) and can be scrolled*/
    lv_obj_t *tab1 = lv_tabview_add_tab(tabview, "Dash");
    lv_obj_t *tab2 = lv_tabview_add_tab(tabview, "Events");
    lv_obj_t *tab3 = lv_tabview_add_tab(tabview, "Setup");

    //--------------------------TAB 1: arc-------------------------------------------
    lv_obj_t * labelArc;
    /*Create an Arc*/
    lv_obj_t * arc = lv_arc_create(tab1, NULL);
    lv_arc_set_end_angle(arc,170);
    lv_obj_set_size(arc, 100, 100);
    labelArc = lv_label_create(arc, NULL);
    lv_obj_align(arc, NULL, LV_ALIGN_IN_TOP_LEFT, 5, 5);
    lv_label_set_text(labelArc, "21");
    lv_obj_align(labelArc,arc, LV_ALIGN_CENTER, 0, 0);
    //--------------------------------------------------------------------------------

    //TAB2 ---------------------------------------------------------------------------
    lv_obj_t * btnm1 = lv_btnmatrix_create(tab2, NULL);
    lv_btnmatrix_set_map(btnm1, btn_labels);
    //lv_btnmatrix_set_btn_width(btnm1, 4, 2);        /*Make "Action1" twice as wide as "Action2"*/
    for (uint8_t i=0;i<4;i++){
        lv_btnmatrix_set_btn_ctrl(btnm1, i, LV_BTNMATRIX_CTRL_CHECKABLE);
    }
    lv_obj_align(btnm1, NULL, LV_ALIGN_IN_TOP_MID, 0, 10);
    lv_obj_set_height(btnm1,50);
    lv_obj_set_width(btnm1,225);
    lv_obj_set_event_cb(btnm1, event_handler_matrix);

    //label = lv_label_create(tab2, NULL);
    ////lv_label_set_text(btnm1, "Second tab");
    //--------------------------------------------------------------------------------

    //----------------------TAB 3: button-----------------------------------------------
    lv_obj_t * labelB;

    lv_obj_t * btn1 = lv_btn_create(tab3, NULL);

    lv_obj_set_event_cb(btn1, event_handler);
    lv_obj_align(btn1, NULL, LV_ALIGN_CENTER, 0, -25);

    labelB = lv_label_create(btn1, NULL);
    lv_label_set_text(labelB, "Button");

    lv_obj_t * btn2 = lv_btn_create(tab3, NULL);
    lv_obj_set_event_cb(btn2, event_handler);
    lv_obj_align(btn2, NULL, LV_ALIGN_CENTER, 0, 25);
    lv_btn_set_checkable(btn2, true);
    lv_btn_toggle(btn2);
    lv_btn_set_fit2(btn2, LV_FIT_NONE, LV_FIT_TIGHT);

    labelB = lv_label_create(btn2, NULL);
    lv_label_set_text(labelB, "Toggled");
    //----------------------------------------------------------------------------------
    /* Create simple label */
    lv_obj_t *bb = lv_label_create(lv_scr_act(), NULL);
    lv_label_set_text(bb, "Manual do Maker - LVGL");
    lv_obj_align(bb, NULL, LV_ALIGN_IN_BOTTOM_MID, 0, -10);

}


/* Display flushing */
void my_disp_flush(lv_disp_drv_t *disp, const lv_area_t *area, lv_color_t *color_p)
{
    uint32_t w = (area->x2 - area->x1 + 1);
    uint32_t h = (area->y2 - area->y1 + 1);

    tft.startWrite();
    tft.setAddrWindow(area->x1, area->y1, w, h);
    tft.pushColors(&color_p->full, w * h, true);
    tft.endWrite();

    lv_disp_flush_ready(disp);
}

bool my_input_read(lv_indev_drv_t * drv, lv_indev_data_t*data)
{
    if ((millis()-time_to_next) > 1000){
        if (tft.getTouch(&t_x, &t_y)){
            data->state = LV_INDEV_STATE_PR ;
            data->point.x = t_x;
            data->point.y = t_y;
            time_to_next = millis();
        }
        else{
            data->state = LV_INDEV_STATE_REL;
            data->point.x = 0;
            data->point.y = 0;
        }
    }

    return false; /*No buffering now so no more data read*/
}

void setup()
{

    Serial.begin(9600); /* prepare for possible serial debug */

    if (!pcfSmart.startI2C(21,22)){
        Serial.println("Not started. Check pin and address.");
        while (true);
    }

    lv_init();

    uint16_t calData[5] = {331, 3490, 384, 3477, 6};

    tft.begin(); /* TFT init */
    tft.setRotation(0); /* Landscape orientation */


    tft.setTouch(calData);

    lv_disp_buf_init(&disp_buf, buf, NULL, LV_HOR_RES_MAX * 10);

    /*Initialize the display*/
    lv_disp_drv_t disp_drv;
    lv_disp_drv_init(&disp_drv);
    disp_drv.hor_res = 240;
    disp_drv.ver_res = 320;
    disp_drv.flush_cb = my_disp_flush;
    disp_drv.buffer = &disp_buf;
    lv_disp_drv_register(&disp_drv);

    /*Initialize the (dummy) input device driver*/
    lv_indev_drv_t indev_drv;
    lv_indev_drv_init(&indev_drv);
    indev_drv.type = LV_INDEV_TYPE_POINTER;
    indev_drv.read_cb = my_input_read;
    lv_indev_drv_register(&indev_drv);

    //lv_ex_btn_1();
    //lv_ex_arc_1();
    lv_ex_tabview_1();
}


void loop()
{
    lv_task_handler(); /* let the GUI do its work */
    delay(5);
}
Se está começando por esse artigo e ainda não usou essa biblioteca, recomendo que retroceda para os primeiros passos com LVGL, vai evitar dores de cabeça.
Vídeo
Gostaria de fazer um vídeo mais elaborado, mas como estou apresentando recurso por recurso, acredito que seja melhor apresentar cada implementação conforme o artigo e depois fazer um vídeo mais elaborado que inclua um pouco de programação. Abaixo, o acionamento dos relés. Perceba que a interface e a ação são extremamente responsivas:
Espero que esteja gostando da série sobre display. Fazendo ações simples separadas facilita na hora de consultar um recurso específico, por isso estou evitando encher de informações em um artigo só.
Até o próximo artigo!
Revisão: Ricardo Amaral de Andrade
Inscreva-se no nosso canal Manual do Maker no YouTube.
Também estamos no Instagram.


Djames Suhanko
Autor do blog "Do bit Ao Byte / Manual do Maker".
Viciado em embarcados desde 2006.
LinuxUser 158.760, desde 1997.