


Manual
do
Maker
.
com
Como criar uma biblioteca para Arduino (library manager)


Dificilmente um sensor ou atuador já não terá uma biblioteca disponível para uso, mas em casos específicos pode ser necessário criar uma biblioteca própria. Se a biblioteca realmente é de uso genérico e pode servir a outras pessoas, por que não adicioná-la ao gerenciador de bibliotecas do Arduino? O processo é relativamente simples.
Atualização do artigo
Esse artigo foi atualizado para a nova forma de submeter bibliotecas para o gerenciador de bibliotecas do Arduino. O processo agora é muito mais rápido. No canal DobitaobyteBrasil no Youtube haverá o vídeo "Criando bibliotecas para Arduino".
Como criar uma biblioteca para Arduino?
Uma biblioteca para Arduino é uma classe C++ a ser incluída em um projeto. O primeiro passo deve ser defini-la. Para exemplo, vou criar uma biblioteca para manipular o PCF8574, que é um expansor de IO de 8 bits, do qual já escrevi diversas vezes a respeito por ser bastante aplicável. Chamei a biblioteca de EasyPCF8574.
Nesse artigo "dominando PCF8574" tem bastante informação, caso tenha interesse em manipular os bits diretamente.
Crie um novo projeto em sua IDE preferida. Gosto do VS Code por diversas razões, sendo que 7 delas estão nesse vídeo comparativo do VSCode x Arduino IDE.
Quando criamos um projeto no VS Code, teremos mais do que é devido, mas não se preocupe com isso no primeiro momento, apenas crie os arquivos .cpp e .h da sua classe. Fiz algo bem curto e prático pra poder colar no artigo. Basicamente, uma classe C++ tem a seguinte estrutura no header:
class NomeDaClasse{
public:
    NomeDaClasse();
    ...
}
E na implementação, tem a estrutura mais ou menos assim:
#include "NomeDaClasse.h"

NomeDaClasse::NomeDaClasse(){
...
}
A implementação ficou desse jeito no arquivo EasyPCF8574.h:
#include <Arduino.h>
#include <Wire.h>
/*
PCF8574 handler - by: Djames Suhanko <djames.suhanko@gmail.com> - 10.01.2020 v.1.0
*/
class EasyPCF8574{
 public:
    bool started;

    //! save last value read.
    uint8_t pcf_last_value;

    EasyPCF8574(uint8_t pcf_addr, uint8_t initial_value);
    //! just a default address value.
    uint8_t pcf_address;

    //! change default PCF8574 address to a new one.
    void setPCFaddress(uint8_t addr);

    //! No matter the old value, this function will ignore it.
    void setFullValue(uint8_t value);
    //! Overriding method, passing pcf_address if more than one is connected
    void setFullValue(uint8_t value, uint8_t pcf_addr);

    //! invert a bit, no matter if actual value is 0 or 1.
    void setInvertBit(uint8_t bit_to_change);
    //! Overriding method, passing pcf_address if more than one is connected
    void setInvertBit(uint8_t bit_to_change, uint8_t pcf_addr);

    //! Turn bit value 0, no metter if bit already was 0.
    void setDownBit(uint8_t bit_to_change);
    //! Overriding method, passing pcf_address if more than one is connected
    void setDownBit(uint8_t bit_to_change, uint8_t pcf_addr);

    //! Turn bit value 1, no matter if bit already was 1.
    void setUpBit(uint8_t bit_to_change);
    //! Overriding method, passing pcf_address if more than one is connected
    void setUpBit(uint8_t bit_to_change, uint8_t pcf_addr);

    //! Gets PCF8574 actual value.
    uint8_t getPCFValue();
    //! Overloaded (or 'Overriding'?) method, passing pcf_address if more than one is connected
    uint8_t getPCFValue(uint8_t pcf_addr);

    //! Gets a specific bit value
    uint8_t getBitValue(uint8_t bit_position);
    //! Overriding method, passing pcf_address if more than one is connected
    uint8_t getBitValue(uint8_t bit_position, uint8_t pcf_addr);

    //! Starts wire with specific pins and returns status.
    bool startI2C(uint8_t sda_pin, uint8_t scl_pin);
    //! Overriding method, passing pcf_address if more than one is connected
    bool startI2C();

    //! Prints help on Serial.
    void help();
};
E no arquivo EasyPCF8574**.cpp** ficou desse jeito:
#include "EasyPCF8574.h"

EasyPCF8574::EasyPCF8574(uint8_t pcf_addr, uint8_t initial_value){
    this->pcf_address    = pcf_addr;
    this->started        = false;
    this->pcf_last_value = initial_value;
}

void EasyPCF8574::setPCFaddress(uint8_t addr){
    this->pcf_address = addr;
}

void EasyPCF8574::setFullValue(uint8_t value){
    if (this->started){
        Wire.beginTransmission(this->pcf_address);
        Wire.write(value);
        Wire.endTransmission();
    }
}

void EasyPCF8574::setFullValue(uint8_t value, uint8_t pcf_addr){
    if (this->started){
        Wire.beginTransmission(pcf_addr);
        Wire.write(value);
        Wire.endTransmission();
    }
}

void EasyPCF8574::setInvertBit(uint8_t bit_to_change){
    if (!this->started) return;

    this->pcf_last_value = pcf_last_value^(1<<bit_to_change);
    this->setFullValue(this->pcf_last_value);
}

void EasyPCF8574::setInvertBit(uint8_t bit_to_change, uint8_t pcf_addr){
    this->pcf_last_value = pcf_last_value^(1<<bit_to_change);
    this->setFullValue(this->pcf_last_value, pcf_addr);
}

void EasyPCF8574::setDownBit(uint8_t bit_to_change){
    this->pcf_last_value = pcf_last_value&~(1<<bit_to_change);
    this->setFullValue(this->pcf_last_value);
}

void EasyPCF8574::setDownBit(uint8_t bit_to_change, uint8_t pcf_addr){
    this->pcf_last_value = pcf_last_value&~(1<<bit_to_change);
    this->setFullValue(this->pcf_last_value, pcf_addr);
}

void EasyPCF8574::setUpBit(uint8_t bit_to_change){
    this->pcf_last_value = pcf_last_value|(1<<bit_to_change);
    this->setFullValue(this->pcf_last_value);
}

void EasyPCF8574::setUpBit(uint8_t bit_to_change, uint8_t pcf_addr){
        this->pcf_last_value = pcf_last_value|(1<<bit_to_change);
    this->setFullValue(this->pcf_last_value, pcf_addr);
}

uint8_t EasyPCF8574::getPCFValue(){
    Wire.requestFrom(this->pcf_address,1);
    if (Wire.available()){
         return Wire.read();
    }
    else{
        return 0;
    }
}

uint8_t EasyPCF8574::getPCFValue(uint8_t pcf_addr){
    Wire.requestFrom(pcf_addr,1);
    if (Wire.available()){
         return Wire.read();
    }
    else{
        return 0;
    }
}

uint8_t EasyPCF8574::getBitValue(uint8_t bit_position){
    Wire.requestFrom(this->pcf_address,1);
    if (Wire.available()){
        this->pcf_last_value = Wire.read();
    }
    return this->pcf_last_value&(1<<bit_position);
}

uint8_t EasyPCF8574::getBitValue(uint8_t bit_position, uint8_t pcf_addr){
    Wire.requestFrom(pcf_addr,1);
    if (Wire.available()){
        this->pcf_last_value = Wire.read();
    }
    return this->pcf_last_value&(1<<bit_position);
}

bool EasyPCF8574::startI2C(uint8_t sda_pin, uint8_t scl_pin){
    if (Wire.begin(sda_pin,scl_pin)){
        this->started = true;
        return true;
    }
}

bool EasyPCF8574::startI2C(){
    if (Wire.begin()){
        this->started = true;
        return true;
    }
}
Agora é hora de escrever um sketch de exemplo. Criei um mostrando as chamadas para um ESP32, passando os pinos SDA e SCL:
#include "EasyPCF8574.h"

EasyPCF8574 pcf_A(0x27,0); //PCF address, initial value
EasyPCF8574 pcf_B(0x29,0);

void setup() {
    Serial.begin(9600);
    //ESP32 example. You can use overloaded function with no parameters in startI2C() method.
    if (!pcf_A.startI2C(21,22)){
        Serial.println("Not started. Check pin and address.");
        while (true);
    }
}

void loop() {
    Serial.println(" Starting cycle:");
    Serial.println("Initial value (as specified):");
    Serial.println(pcf_A.getPCFValue());
    delay(500);

    Serial.println("Setting value to (39):");
    //00100111
    pcf_A.setFullValue(0x27); //like pcf address :)
    Serial.println("Byte now is:");
    Serial.println(pcf_A.getPCFValue());
    delay(500);

    Serial.println("Checking bit 2 status:"); //bits starts in 0, from right to left
    Serial.println(pcf_A.getBitValue(2));
    Serial.println("Byte now is:");
    Serial.println(pcf_A.getPCFValue());
    delay(500);

    Serial.println("Inverting  bit 2 value");
    pcf_A.setInvertBit(2);
    Serial.println(pcf_A.getBitValue(2));
    Serial.println("Byte now is:");
    Serial.println(pcf_A.getPCFValue());
    delay(500);

    Serial.println("Set bit 2 up:");
    pcf_A.setUpBit(2);
    Serial.println(pcf_A.getBitValue(2));
    Serial.println("Byte now is:");
    Serial.println(pcf_A.getPCFValue());
    delay(500);

    Serial.println("Set bit 2 down");
    pcf_A.setDownBit(2);
    Serial.println(pcf_A.getBitValue(2));
    Serial.println("Byte now is:");
    Serial.println(pcf_A.getPCFValue());
    delay(500);

    Serial.println("Done.");
    delay(5000);
}
Estrutura de diretórios e arquivos para a biblioteca
Para criar uma biblioteca para Arduino que esteja disponível oficialmente, um padrão deve ser seguido. Os arquivos da classe ficaram em src e o sketch de exemplo em examples.
Um arquivo library.properties precisa ser criado na raiz do diretório da biblioteca, contendo as informações:
name=EasyPCF8574
version=1.0.5
author=Djames Suhanko
maintainer=Djames Suhanko
sentence=Generic library for PCF8574 easy to use
paragraph=Generic library for PCF8574 easy to use
category=Device Control
url=https://github.com/DjamesSuhanko/EasyPCF8574
architectures=esp32
includes=EasyPCF8574.h
Do mesmo modo, um arquivo json chamado library.json com o seguinte conteúdo:
{
    "name": "EasyPCF8574",
    "keywords": "i2c,wire",
    "description": "Generic library for PCF8574 easy to use",
    "repository":
    {
        "type": "git",
        "url": "https://github.com/DjamesSuhanko/EasyPCF8574"
    },
    "authors":
    {
        "name": "Djames Suhanko",
        "url": "https://github.com/DjamesSuhanko",
        "maintainer": true
    },
    "version": "1.0.5",
    "license": "MIT",
    "frameworks": "arduino",
    "platforms": "espressif8266, espressif32, ststm32"
}
Bom, aí em cima já vemos a URL do repositório, hum? Crie o repositório, clone-o e coloque sua estrutura dentro dele. Deve ficar assim:


Faça o commit e o push, então vá ao repositório e crie uma release na coluna da direita. Como já criei a release, a aparência fica assim:
Já tem mais versões lá porque mosquei e esqueci de criar o arquivo library.json, aí esqueci de mudar a versão, aí mudei o nome do diretório, aí esqueci de novo de mudar a versão...
O padrão do arquivo está especificado nessa URL. Tem alguns recursos extras que eventualmente você poderá utilizar ao criar uma biblioteca para Arduino.
Processo antigo - não é mais válido
Agora, abra uma issue no github do Arduino.


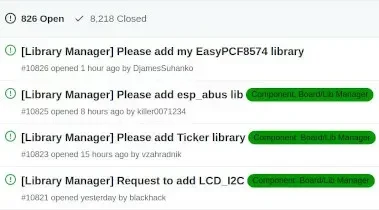
Esse processo antigo levava uns 10 dias. Com o novo processo, algo em torno de 1 dia. . Depois disso, é só entrar na caixa de pesquisa, procurar sua biblioteca e instalá-la. Se houver algum erro, alguém da equipe informará o que precisa ser modificado.
Como submeter sua biblioteca
No novo processo, você deve editar o arquivo de repositórios do Arduino. Inclua o link do repositório, como https://github.com/DjamesSuhanko/EasyPCF8574. Pode incluir em qualquer posição, não importa. Depois, vá ao fim da página e clique em [Propose Changes]. Depois, na janela "Comparing changes", clique em [Create pull request]. Abrir-se-á uma nova janela "Open a pull request", onde devemos clicar novamente em [Create pull request]. A checagem será automática, como mostro no vídeo. Ela é iniciada imediatamente após a publicação das alterações e, havendo algum problema, as sugestões de correção serão exibidas na hora. Como já estou em minha quarta biblioteca, tenho um padrão bem definido, isento de erros.
Se houver problema com o pull request ou com a biblioteca, siga o procedimento descrito nessa documentação.
Abaixo, um código de exemplo que liga e desliga sequencialmente os pinos de um PCF8574 com valor inicial de 0, no endereço 0x27:
#include "EasyPCF8574.h"

EasyPCF8574 pcf_A(0x27, 0); //PCF address, initial value

uint8_t i = 0;

void setup() {
  Serial.begin(9600);
  if (!pcf_A.startI2C(21, 22)) {
    Serial.println("Not started. Check pin and address.");
    while (true);
  }
}

//sequential up/down.
void loop() {
  pcf_A.setInvertBit(i);
  delay(1000);
  i = i >5 ? 0 : i+1;
}
A biblioteca EasyPCF8574 já está publicada e vi a diferença no procedimento quando fui postar a biblioteca para a PCF8575, que é um expansor da mesma família, mas com 2 bytes. Enquanto isso, que tal já ir escrevendo as suas?
Revisão: Ricardo Amaral de Andrade
Inscreva-se no nosso canal Manual do Maker no YouTube.
Também estamos no Instagram.


Djames Suhanko
Autor do blog "Do bit Ao Byte / Manual do Maker".
Viciado em embarcados desde 2006.
LinuxUser 158.760, desde 1997.