


Manual
do
Maker
.
com
Como criar tabs com LVGL


Essa biblioteca tem tantos recursos que jogar um projeto pronto não vai deixar clara sua utilização. Por essa razão, vou escrevendo diversos artigos mostrando os recursos aos poucos, então quando tiver elaborado um projeto final no estilo do misturador de cores, todos estaremos íntimos da biblioteca e seus recursos. Nesse artigo veremos como criar tabs com LVGL.
LVGL Widgets - tab
O bom de usar tabs é que não ficamos limitados à área do display. Imagine que em uma área de 320x240 consigamos distribuir bem 6 widgets. Se estivermos monitorando 8 bits de um PCF8574, talvez possamos espremer um pouco e criar objetos mais simples, mas se tivermos arcos de porcentagem, uma área quadrada maior é requerida e aí uma tela só é pouco. Sem problemas, se soubermos como criar tabs com LVGL!
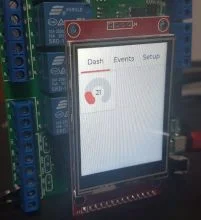
No artigo passado expliquei sobre a prática de criar funções para alocar os recursos, depois chamá-los no setup. Para as tabs, criaremos a função do exemplo com algumas modificações - porque ver só texto é chato, hum? Na primeira tab, chamei de Dash, a segunda de Events e a terceira de Setup. Podemos adicionar mais tabs ou tabs dentro de tabs. O céu é o limite!
Na primeira tab coloquei o widget arc, que é um tipo circular. Na tab de eventos não coloquei nada, deixei só um label. Em setup, coloquei os botões do artigo anterior. Para utilizar o mesmo widget do artigo anterior, a única modificação necessária foi o alvo, que era a screen principal e agora é a tab escolhida. Fácil demais!
Esse é o código da função de teste, lv_ex_tabview_1(void):
void lv_ex_tabview_1(void)
{
    /*Cria um objeto chamado tab. Até aqui é um objeto padrão*/
    lv_obj_t *tabview;
    tabview = lv_tabview_create(lv_scr_act(), NULL); //agora está definido o tipo do widget

    /*Cria 3 tabs*/
    lv_obj_t *tab1 = lv_tabview_add_tab(tabview, "Dash");
    lv_obj_t *tab2 = lv_tabview_add_tab(tabview, "Events");
    lv_obj_t *tab3 = lv_tabview_add_tab(tabview, "Setup");


    /*Insere os dados nas tabs*/
    lv_obj_t * label = lv_label_create(tab1, NULL);

    label = lv_label_create(tab2, NULL);
    lv_label_set_text(label, "Second tab"); //aqui na segunda tab é só um label mesmo

    //TAB 1: arc - código básico para a criação de um arco
    lv_obj_t * labelArc;
    /*Create an Arc*/
    lv_obj_t * arc = lv_arc_create(tab1, NULL);
    lv_arc_set_end_angle(arc,170);
    lv_obj_set_size(arc, 100, 100);
    //uint16_t start_angle = lv_arc_get_angle_start(arc);
    //uint16_t end_angle = lv_arc_get_angle_end(arc);

    labelArc = lv_label_create(arc, NULL);

    lv_obj_align(arc, NULL, LV_ALIGN_IN_TOP_LEFT, 0, 0);
    lv_label_set_text(labelArc, "21");
    lv_obj_align(labelArc,arc, LV_ALIGN_CENTER, 0, 0);

    //TAB 3: button - código utilizado no artigo anterior. Repare que em
    // lv_btn_create só foi mudado o primeiro parâmetro, o resto é idêntico
    //ao artigo anterior
    lv_obj_t * labelB;

    lv_obj_t * btn1 = lv_btn_create(tab3, NULL);

    lv_obj_set_event_cb(btn1, event_handler);
    lv_obj_align(btn1, NULL, LV_ALIGN_CENTER, 0, -25);

    labelB = lv_label_create(btn1, NULL);
    lv_label_set_text(labelB, "Button");

    lv_obj_t * btn2 = lv_btn_create(tab3, NULL);
    lv_obj_set_event_cb(btn2, event_handler);
    lv_obj_align(btn2, NULL, LV_ALIGN_CENTER, 0, 25);
    lv_btn_set_checkable(btn2, true);
    lv_btn_toggle(btn2);
    lv_btn_set_fit2(btn2, LV_FIT_NONE, LV_FIT_TIGHT);

    labelB = lv_label_create(btn2, NULL);
    lv_label_set_text(labelB, "Toggled");

}
Com essa função, podemos eliminar a função de botão do artigo anterior e o restante do código fica igual:
#include <lvgl.h>
#include <TFT_eSPI.h>
#include <stdio.h>

TFT_eSPI tft = TFT_eSPI(); /* TFT instance */
static lv_disp_buf_t disp_buf;
static lv_color_t buf[LV_HOR_RES_MAX * 10];

uint16_t t_x = 0, t_y = 0;
bool touched = false;

unsigned long time_to_next = millis();

//prototipos
void lv_ex_btn_1(void);
void lv_ex_tabview_1(void);
void lv_ex_arc_1(void) ;

static void event_handler(lv_obj_t * obj, lv_event_t event)
{
    if(event == LV_INDEV_STATE_PR) {
        printf("Clicked\n");
    }
}


//****************************** WIDGETS ****************************************//
void lv_ex_tabview_1(void)
{
    /*Create a Tab view object*/
    lv_obj_t *tabview;
    tabview = lv_tabview_create(lv_scr_act(), NULL);

    /*Add 3 tabs (the tabs are page (lv_page) and can be scrolled*/
    lv_obj_t *tab1 = lv_tabview_add_tab(tabview, "Dash");
    lv_obj_t *tab2 = lv_tabview_add_tab(tabview, "Events");
    lv_obj_t *tab3 = lv_tabview_add_tab(tabview, "Setup");


    /*Add content to the tabs*/
    lv_obj_t * label = lv_label_create(tab1, NULL);

    label = lv_label_create(tab2, NULL);
    lv_label_set_text(label, "Second tab");

    //TAB 1: arc
    lv_obj_t * labelArc;
    /*Create an Arc*/
    lv_obj_t * arc = lv_arc_create(tab1, NULL);
    lv_arc_set_end_angle(arc,170);
    lv_obj_set_size(arc, 100, 100);
    //uint16_t start_angle = lv_arc_get_angle_start(arc);
    //uint16_t end_angle = lv_arc_get_angle_end(arc);

    labelArc = lv_label_create(arc, NULL);

    lv_obj_align(arc, NULL, LV_ALIGN_IN_TOP_LEFT, 0, 0);
    lv_label_set_text(labelArc, "21");
    lv_obj_align(labelArc,arc, LV_ALIGN_CENTER, 0, 0);

    //TAB 3: button
    lv_obj_t * labelB;

    lv_obj_t * btn1 = lv_btn_create(tab3, NULL);

    lv_obj_set_event_cb(btn1, event_handler);
    lv_obj_align(btn1, NULL, LV_ALIGN_CENTER, 0, -25);

    labelB = lv_label_create(btn1, NULL);
    lv_label_set_text(labelB, "Button");

    lv_obj_t * btn2 = lv_btn_create(tab3, NULL);
    lv_obj_set_event_cb(btn2, event_handler);
    lv_obj_align(btn2, NULL, LV_ALIGN_CENTER, 0, 25);
    lv_btn_set_checkable(btn2, true);
    lv_btn_toggle(btn2);
    lv_btn_set_fit2(btn2, LV_FIT_NONE, LV_FIT_TIGHT);

    labelB = lv_label_create(btn2, NULL);
    lv_label_set_text(labelB, "Toggled");

}


/* Display flushing */
void my_disp_flush(lv_disp_drv_t *disp, const lv_area_t *area, lv_color_t *color_p)
{
    uint32_t w = (area->x2 - area->x1 + 1);
    uint32_t h = (area->y2 - area->y1 + 1);

    tft.startWrite();
    tft.setAddrWindow(area->x1, area->y1, w, h);
    tft.pushColors(&color_p->full, w * h, true);
    tft.endWrite();

    lv_disp_flush_ready(disp);
}

bool my_input_read(lv_indev_drv_t * drv, lv_indev_data_t*data)
{
    if ((millis()-time_to_next) > 1000){
        if (tft.getTouch(&t_x, &t_y)){
            data->state = LV_INDEV_STATE_PR ;
            data->point.x = t_x;
            data->point.y = t_y;
            time_to_next = millis();
        }
        else{
            data->state = LV_INDEV_STATE_REL;
            data->point.x = 0;
            data->point.y = 0;
        }
    }

    return false; /*No buffering now so no more data read*/
}

void setup()
{

    Serial.begin(9600); /* prepare for possible serial debug */

    lv_init();

    uint16_t calData[5] = {331, 3490, 384, 3477, 6};

    tft.begin(); /* TFT init */
    tft.setRotation(0); /* Landscape orientation */


    tft.setTouch(calData);

    lv_disp_buf_init(&disp_buf, buf, NULL, LV_HOR_RES_MAX * 10);

    /*Initialize the display*/
    lv_disp_drv_t disp_drv;
    lv_disp_drv_init(&disp_drv);
    disp_drv.hor_res = 240;
    disp_drv.ver_res = 320;
    disp_drv.flush_cb = my_disp_flush;
    disp_drv.buffer = &disp_buf;
    lv_disp_drv_register(&disp_drv);

    /*Initialize the (dummy) input device driver*/
    lv_indev_drv_t indev_drv;
    lv_indev_drv_init(&indev_drv);
    indev_drv.type = LV_INDEV_TYPE_POINTER;
    indev_drv.read_cb = my_input_read;
    lv_indev_drv_register(&indev_drv);

    /* Create simple label */
    lv_obj_t *label = lv_label_create(lv_scr_act(), NULL);
    lv_label_set_text(label, "Manual do Maker - LVGL");
    lv_obj_align(label, NULL, LV_ALIGN_IN_BOTTOM_MID, 0, 0);

    //lv_ex_btn_1();
    //lv_ex_arc_1();
    lv_ex_tabview_1();
}


void loop()
{
    lv_task_handler(); /* let the GUI do its work */
    delay(5);
}
Onde comprar o display?
Tanto o display quanto a placa você encontra na AFEletronica, através desse link. Vale muito a pena ter uma placa dessa que dispensa wiring. Convenhamos que SPI vai um bocado de fios, hum? A placa se chama AFSmartControl.
Vídeo
Agora já é bom mostrar um vídeo do recurso funcionando, pelo menos pra ter uma ideia do que se trata, então fiz esse vídeo demonstrativo, cujo nome é "Como criar tabs com LVGL", mas é apenas para remeter ao artigo, não estou mostrando nada além do funcionamento. Não precisa dar like, porque é um vídeo não listado, só para vocês, leitores do blog.
Até a próxima!
Revisão: Ricardo Amaral de Andrade
Inscreva-se no nosso canal Manual do Maker no YouTube.
Também estamos no Instagram.


Djames Suhanko
Autor do blog "Do bit Ao Byte / Manual do Maker".
Viciado em embarcados desde 2006.
LinuxUser 158.760, desde 1997.